ROYAL FACADE
Thin Brick Panels Royal Facade Insulation Installation Guide
Technical solutions album for wall insulation panels
with thin brick tiles ™ROYAL FACADE
Installation Instructions
for insulated panels ™ROYAL FACADE
І. Introduction
The process of facade insulation using thermopanels involves applying special schemes according to which all facing materials are arranged, insulation installation. At the very beginning of the planned installation work, quality surface preparation is carried out, ensuring the surface is dry, clean from dirt, and level.
Please be advised that the warranty covers Royal Facade products. We are responsible for the integrity of the structure, specifically the thin brick thermal panel. The installation process is managed by the finishing team.
General manufacturer recommendations:
1. Faced insulation installation can be performed in any season, so don’t postpone insulating your house facade until favorable weather conditions.
2. Use all-season mounting glue-foam only at ambient temperatures from 14°F to 95°F.
3. Before choosing the grout color and beginning the Joint Grouting process, seal a small corner or section of the thermopanel and wait a few days to ensure you’re confident in your choice.
4. If weather conditions are unfavorable for Sealing Tile Joints, use acrylic instead of water for dark colors. However, ALWAYS consult with our manufacturing specialist about proportions before starting work.
5. To ensure high precision in all installation work and reduce waste, it’s recommended to use special layout schemes for clinker panels. If the facade area calculation was done by the manufacturer, these schemes can be obtained from our managers.
6. Before beginning installation work, a mandatory facade inspection should be performed: for example, checking for any deviations in the facade; presence of protruding elements; verifying the specifics of gas pipe installation and fixation (whether any preparatory measures are necessary).
7. If you have questions about foam board insulation installation, either in advance or during the process, contact the manufacturer’s specialist at +1 (509) 655-4403.
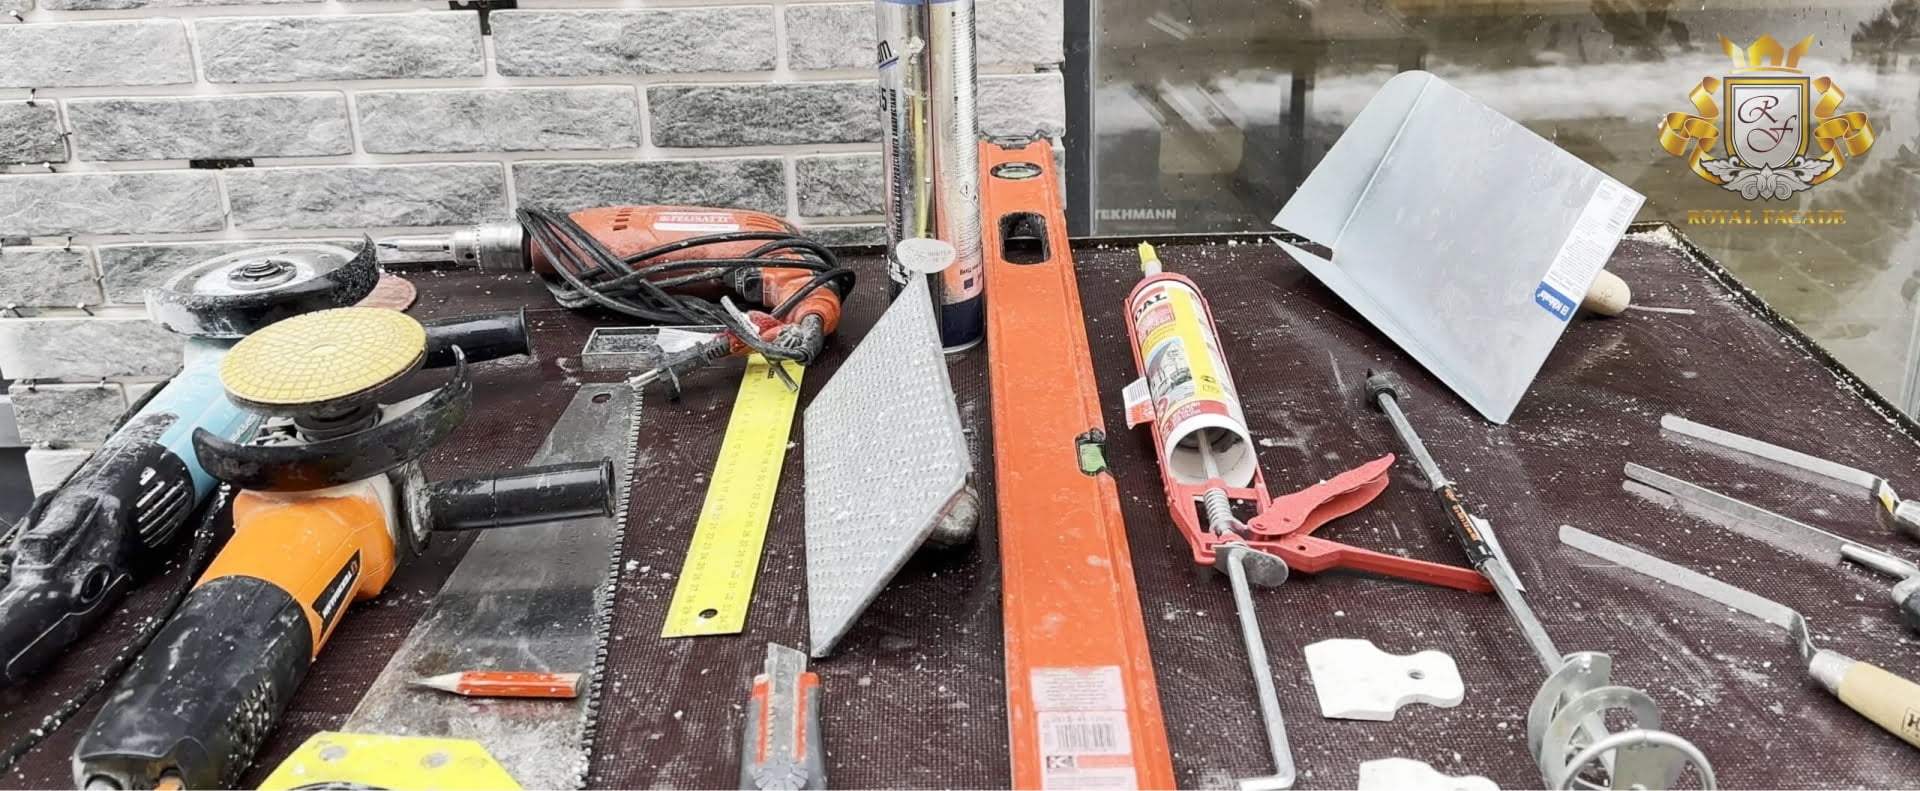
For the wall insulation installation you will need the following tools:
- Angle grinder
- Diamond and grinding disc
- Impact drill
- Mixer attachment
- Buckets
- Polyethylene film
- Wood saw
- Building Level
- Grout float and trowel
- Square
- Knife
- Marker
- Construction line
- Trowel for leveling foam insulation board

II. Technological operations for thermopanel installation
Taking into account all the features and modern construction standards, house insulation with Clinker Facade Panels can be divided into the following important stages:
1. Base preparation – exterior walls (according to building codes). Our specialists use a level for inspection. As a result, you’ll be able to make the right choice when selecting the length of fastening elements.
In order to choose the right length of the elements for fastening and calculate the consumption of the adhesive mixture, the curvature of the facade on an area of up to 3 m² should not exceed ±10 mm.
IMPORTANT! When performing insulation and installation (with the help of specialists or on your own), you need to remember their storage features: they can be stored indoors or outdoors. But you should inform the manufacturer in advance, as there are two types of thermopanel delivery: with packaging and without.

Fig. 1. Magnetic conical plumb bob
We recommend watching the detailed video instructions where you can learn about the installation of thermal panels, as well as the proper insulation of the building facade:
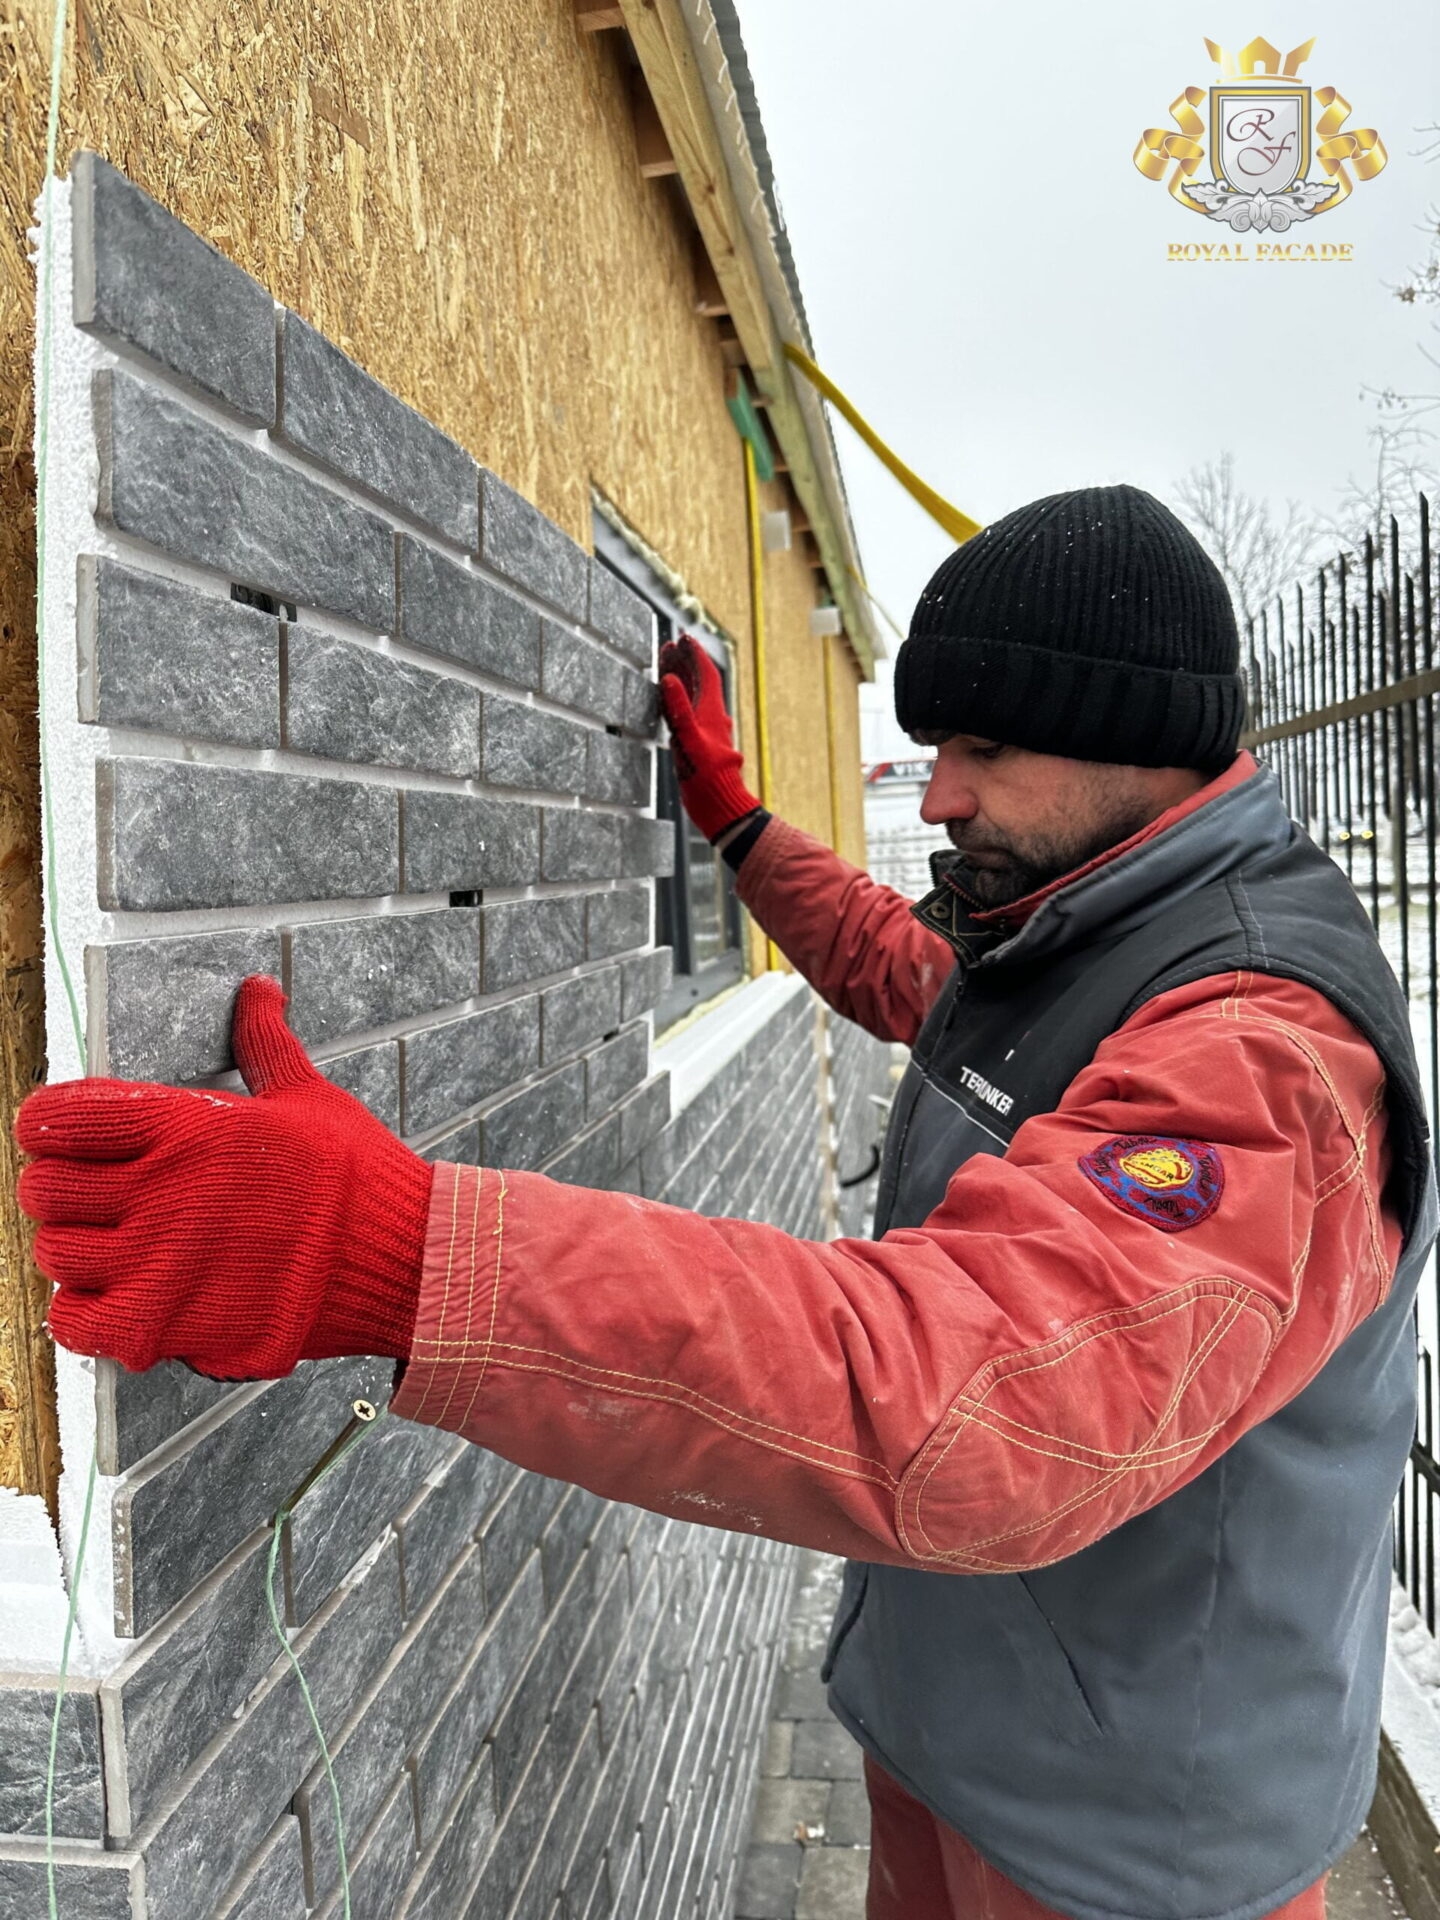
3. XPS foam board insulation installation. When following the installation technology, you must perform the following important steps – proper placement of cladding panels, marking, drilling and preparation (cleaning) of holes, application of fasteners, fixing panels on the facade surface.
4. Grouting/Sealing Tile Joints. You must use special grouting mixtures, following the manufacturer’s instructions on the packaging. Additionally, you should familiarize yourself with the recommendations from Royal Facade company specialists.
In order to ensure high Energy Efficiency indicators before fixing the panels, preliminary preparation of the exterior wall is required: leveling, priming. In this case, the presence of lathing is not a mandatory condition.
IMPORTANT! Grouting joints in Clinker Insulated Panels must be performed taking into account certain weather conditions. If it is not possible to read the manufacturer’s instructions (for example, due to packaging damage or illegible text), you should consult the company manager. It’s also possible to download instructions from the manufacturer’s website or watch detailed video video instruction!
According to the insulated wall panel installation guide, fastening should be done directly to the exterior wall. But before starting fastening work, you should prepare the facade – level and prime it. Installation is carried out without Lathing!
ІІІ. Installation of external corners
The base of the exterior wall must be prepared – the facade should be perfectly clean, level, and dry. If there are any contaminants, they should be removed immediately (for example, bitumen or oil stains).
Corner installation can be performed using one of two possible methods:
- Create a corner using a wall thermopanel.
- Use a ready-made Corner Thermal Panel from the manufacturer.
To make the right choice, it’s necessary to examine both methods in more detail (drawings are available in the technical solutions album at the link).
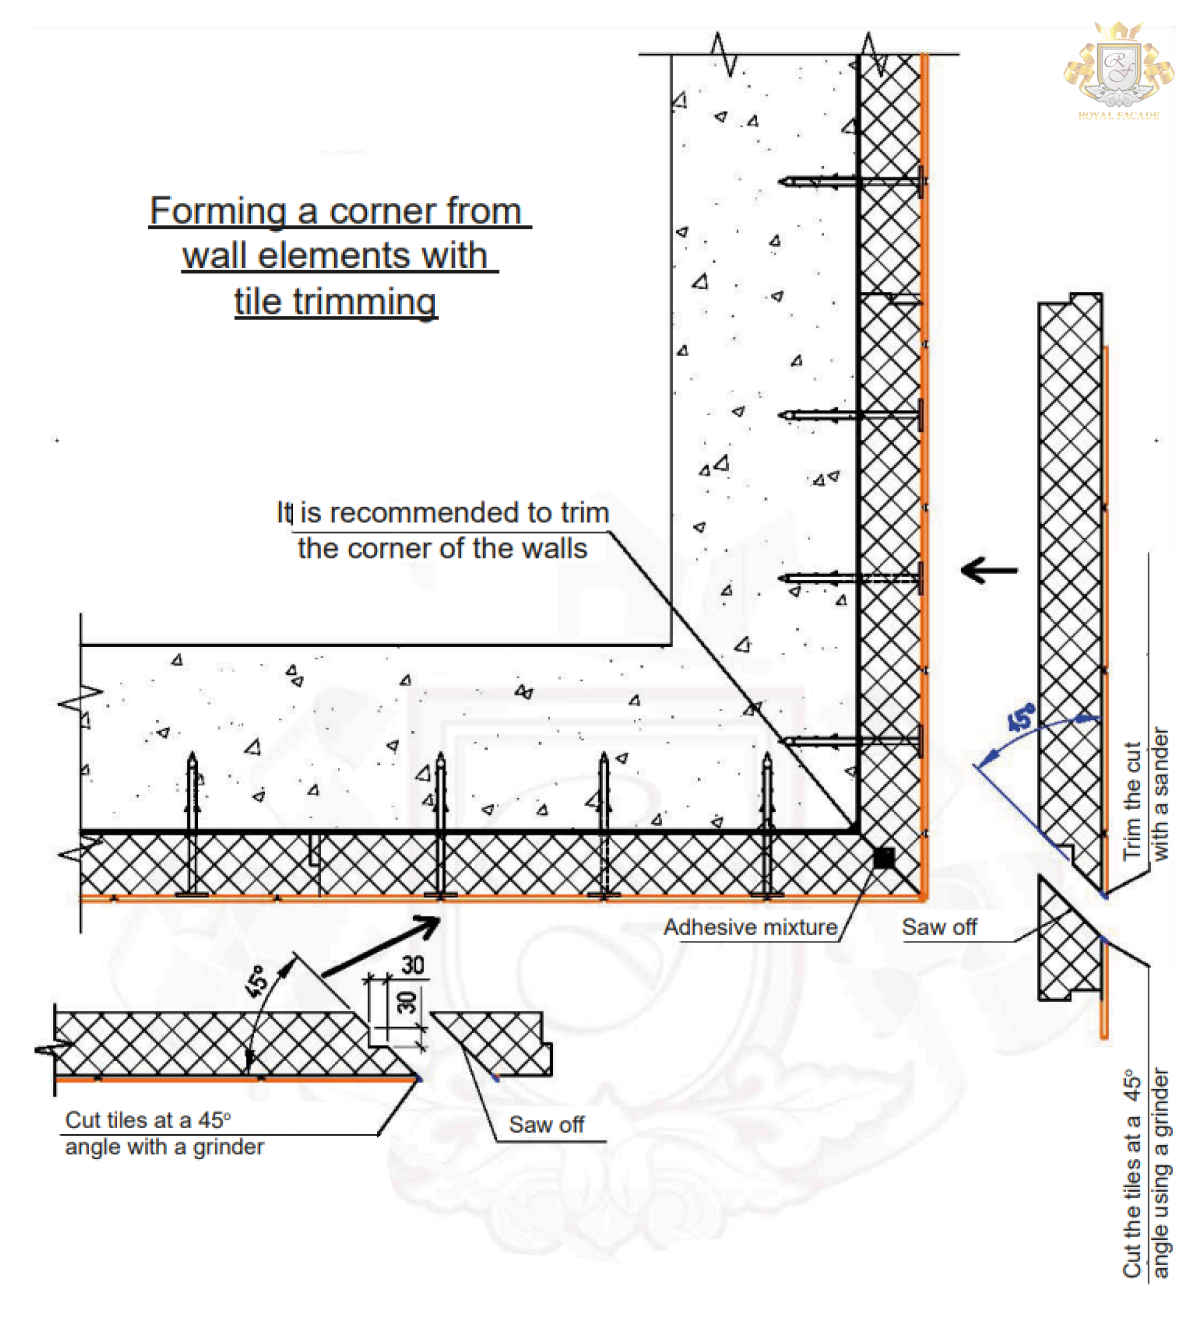
Method 1. Creating a corner independently from wall Thermal Insulation Panels.
In this case, corner formation is done manually at the construction site (more details can be found in the video instructions
- Cutting the Wall Insulated Panel.
All work must be performed at the construction site. Before starting the planned work, it’s recommended to determine the corner parameters of the specific residential complex that needs insulation. Additionally, you need to identify all geometric features of the facade section.
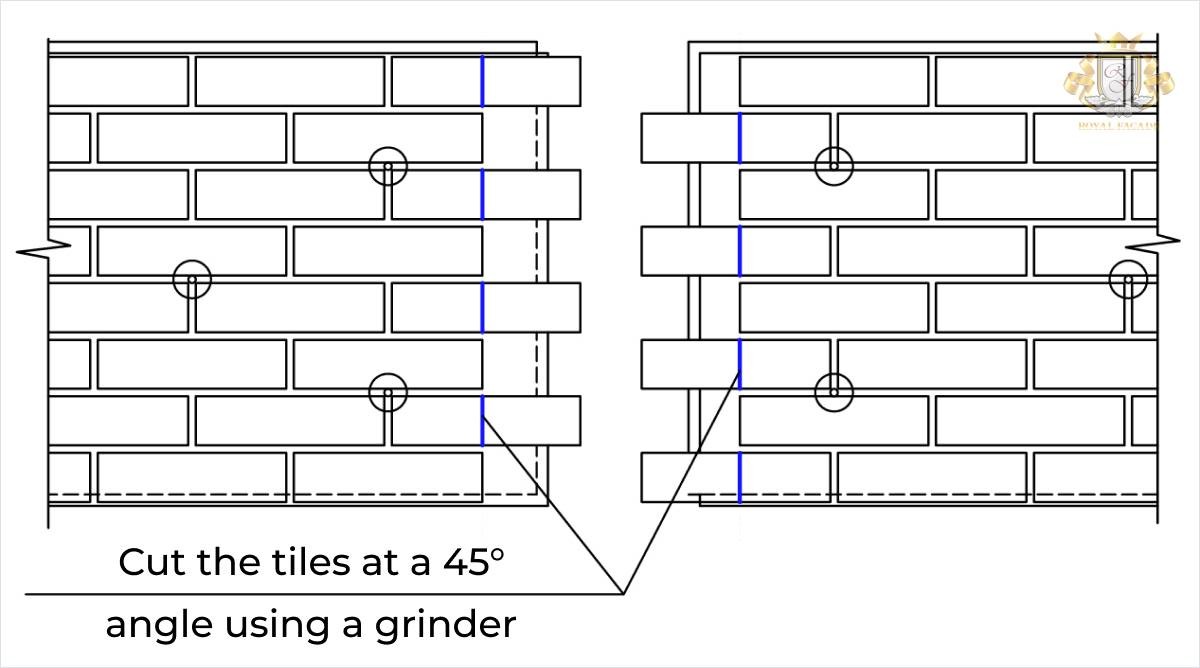
Mark the cutting lines using a construction pencil/Marker, after which you can proceed to cut the panel: to cut the tile (decorative protective layer), it’s sufficient to use a grinding machine. - Exterior wall surfaces need to be prepared by treating them with primer (primer mixture).
- Using a Level (laser/water), determine the level for placing the first row of thermopanels. When performing expanded polystyrene foam board insulation installation, consider all the features of the specific building.
- According to the established level, install the galvanized Starter Track.
- Installation should begin from a corner – either external or internal.
- To create a corner from wall panels independently, it’s recommended to use the following set of tools: utility knife, handsaw, and ruler. To give the corner specific parameters, use a special Angle Bar.
- Using an Angle Grinder with a diamond disc (4.92 inches diameter) at a speed of 10,000-11,000 RPM, make careful cuts on the tile surface. All cuts should be made along previously marked lines.
IMPORTANT! It is mandatory to use construction gloves and transparent protective goggles when performing these tasks!
- Apply foam adhesive around the entire perimeter of the facing panels (when working in winter, it’s best to use an all-season formula). Maintain a distance from the edge of 0.79 inches or more.
- Taking into account the specific parameters, form a neat external corner. After completing the grouting joints work, proceed to use sealant – apply sealant to the tile joint (matching the color of the grout or tile).
Detailed Video Instructions for Understanding the Process of Forming an External Corner from Wall Thermal Panels for Home Insulation.
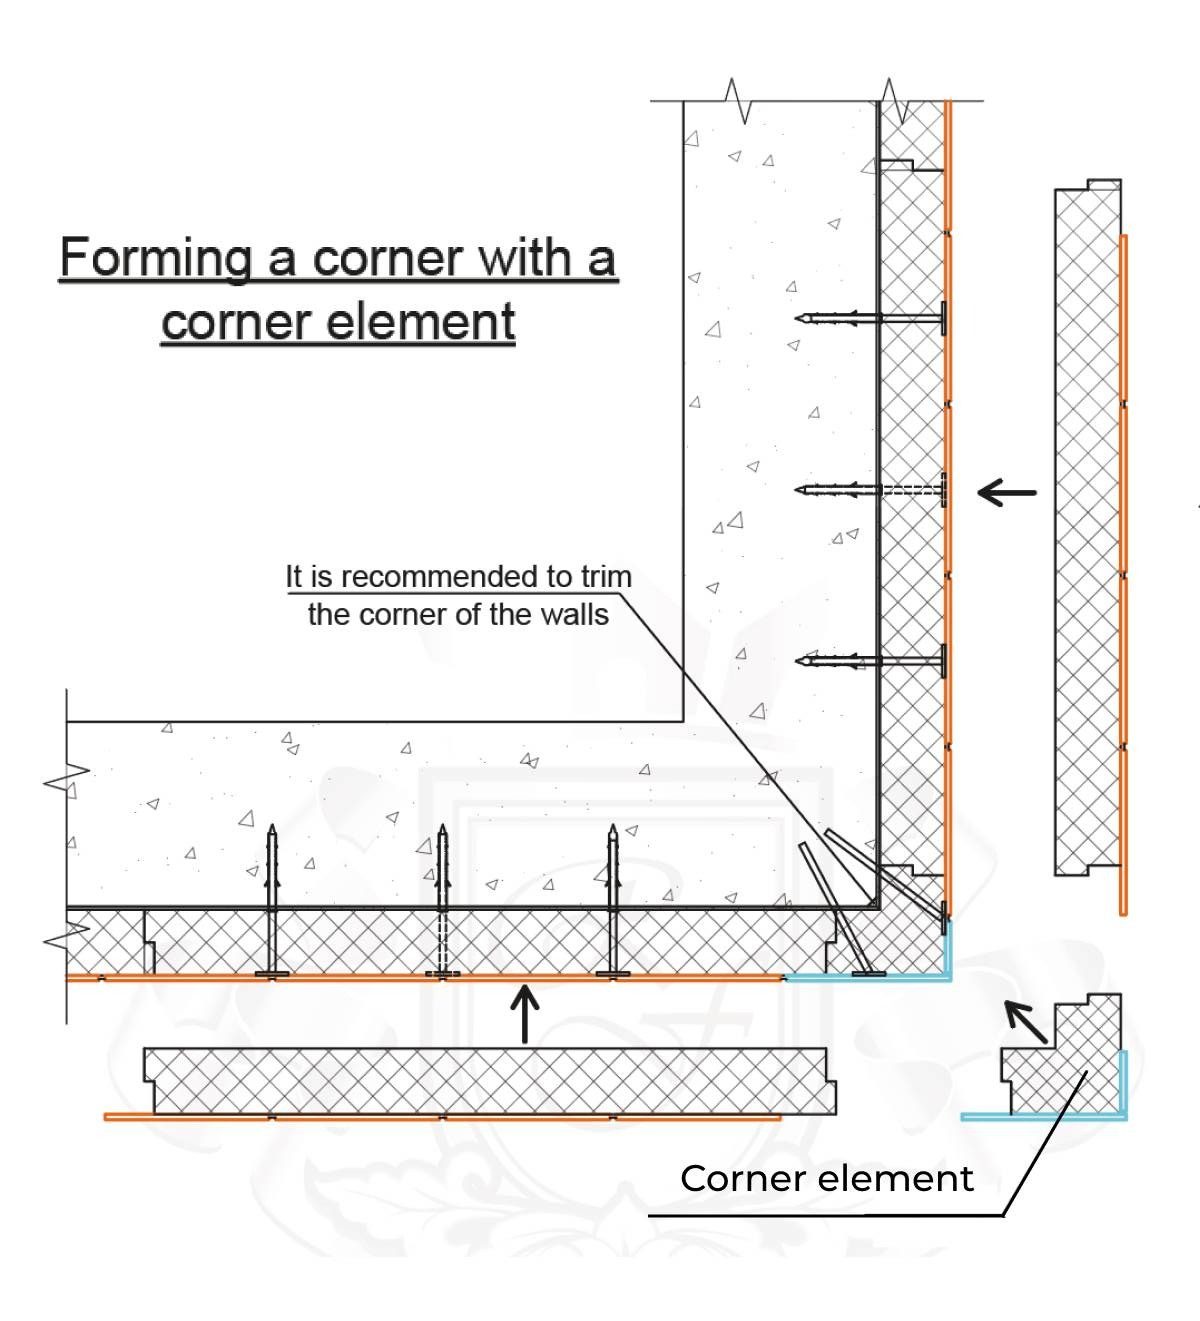
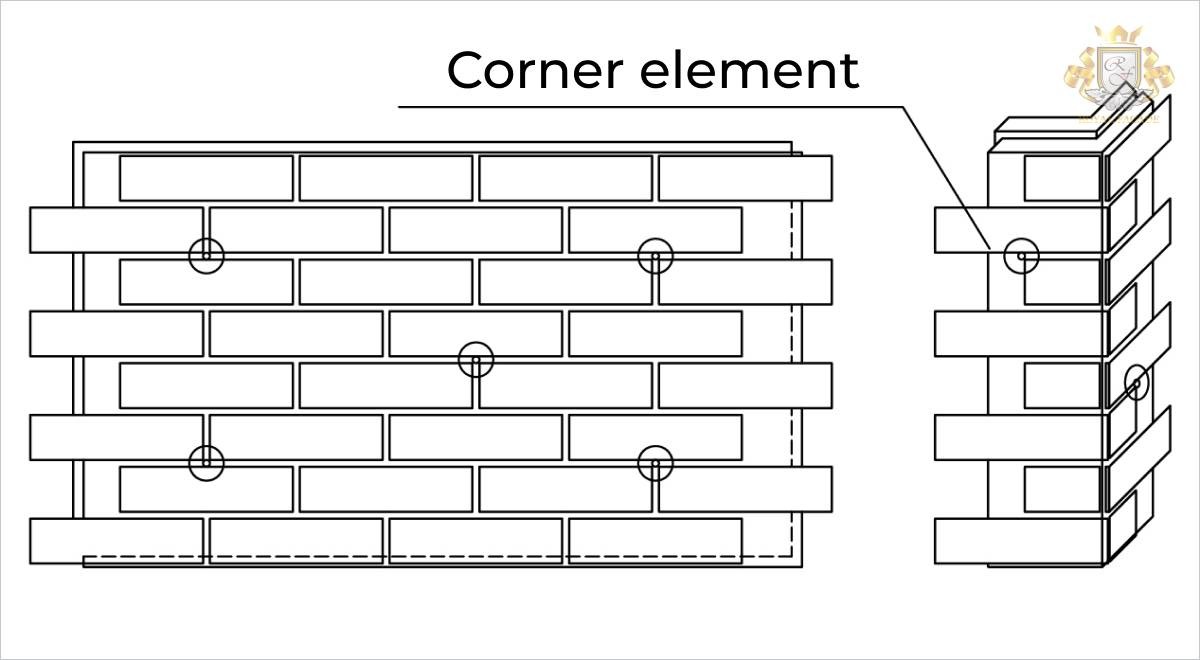
Method 2. Using a Ready-Made Corner Insulated Panel from Royal Facade
The corner element from Royal Facade is a monolithic sturdy structure consisting of a layer of polystyrene foam (expanded or extruded) with pressed tiles featuring different cutting angles (90° or 45°).
- Glue-foam should be carefully applied to the inner surface of the corner element using a gun. The adhesive foam layer should be 0.59 inches thick. Maintain a distance from the edge of 1.97 inches or more.
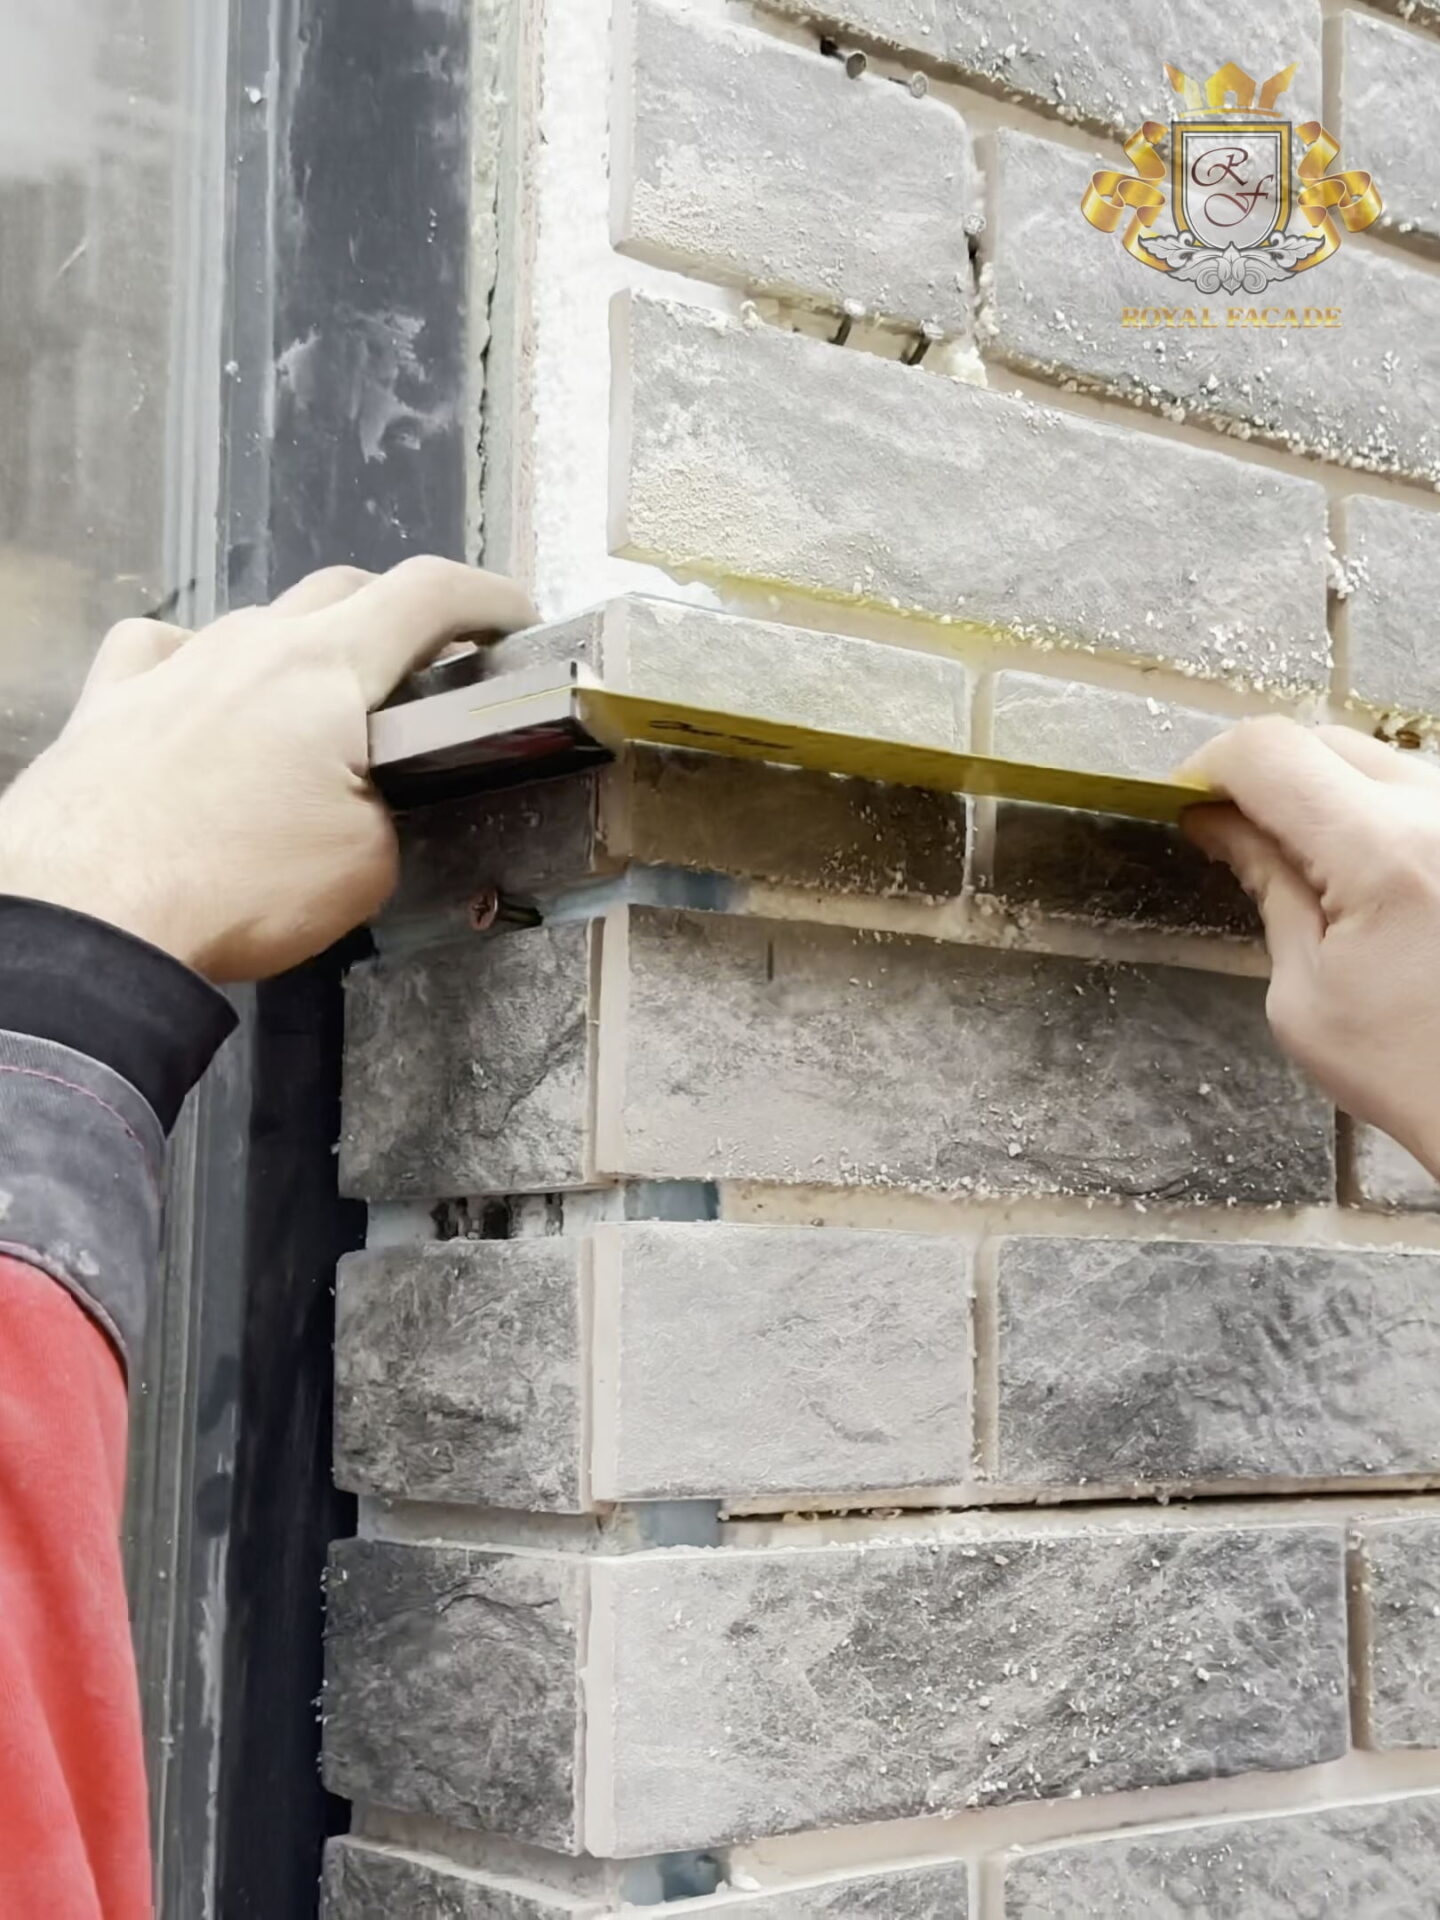
- After this, the Corner Insulated Panel can be pressed against the exterior wall surface, while monitoring its position level – both horizontal and vertical. It’s equally important to control the thickness of the inter-tile joint.
- The optimal consumption of adhesive foam is 1 canister for every 75.35 square feet of facade. Remember that you can adjust the position of thermal panels within the first 15 minutes after fixing it to the wall (provided that the outdoor temperature ranges from 23°F to 95°F, and the temperature of each adhesive foam canister is at least 71.6°F).
IMPORTANT! Installation of corner elements, window Slope, and other additional installation work are not included in the standard cost of clinker thermopanel installation service. Therefore, during preliminary calculations, it’s necessary to consider the entire range of planned work to properly plan your future budget and account for the insulation installation cost per square foot.
- Fastening corner elements using quick-mounting dowels occurs after the final alignment of such elements, as well as after the complete hardening of the adhesive foam.
Thus, all work related to fixing the Royal Facade corner element should be performed taking into account all requirements and installation standards for conventional panels for facade decoration.
ІV. Insulation with thermopanels: window trim installation
The process of installing a window Incline is considered an equally important and responsible stage in insulation foam board installation and facade cladding using clinker tiles. First, pay attention to quality marking of the slope: it’s necessary to take into account the depth and width of the window trim, referring to the specifics of the particular building. After obtaining important information, you can begin further work – cutting the wall panel. For this, measurements must be taken from the window profile to the inner part of the tile on the building facade.
When cladding the facade using clinker thermopanels and installing all window trims, consider several other important features:
- If the depth of the window profile does not exceed 4.92 inches, it’s recommended to use several elements at once to form the slopes.
- Before applying adhesive foam to the Foam insulation board layer of the window trim, this surface needs to be prepared. First, use a trowel designed for working with foam.
- When fixing fasteners, consider the width of the future tile joint in advance.
To ensure all tasks are performed correctly, use a level and Square for verification. Additionally, you can familiarize yourself with insulation board installation instructions.
V. How to install thermal panels: fasteners set
When performing insulation of the facade with thermal panels, it’s necessary to ensure quality insulation by familiarizing yourself with the insulated panel installation guide. Even at the cost estimation stage of panel installation, clients can save time by selecting the necessary set of fastening elements.
The choice of such elements is made considering the material from which the Private House facade was created:
- For wooden facades, special wood screws are used.
- For ceramic block facades, expansion anchors are used.
- For concrete, brick, and stone facades, hammer drive anchors are used.
- For work with aerated concrete facades, appropriate aerated concrete anchors are used.
Remember that correctly chosen type and size of fasteners also affects the quality of heat retention in the house and the facade design for a long time.
VІ. Grouting or joint striking after completing facade insulation with panels
When house insulation with clinker tile has been completed, after 24 hours (after the adhesive dries), it’s necessary to begin the grouting procedure. This process must be performed no later than 30 days after completing all installation work. It’s recommended to perform grouting at air temperatures between +41°F and +86°F in dry, preferably cloudy weather.
We recommend watching the Sealing Tile Joints video instruction:
The grouting compound can be applied using one of two possible methods:
- Using a hand gun. After a few hours, you can begin forming the joint using a spatula;
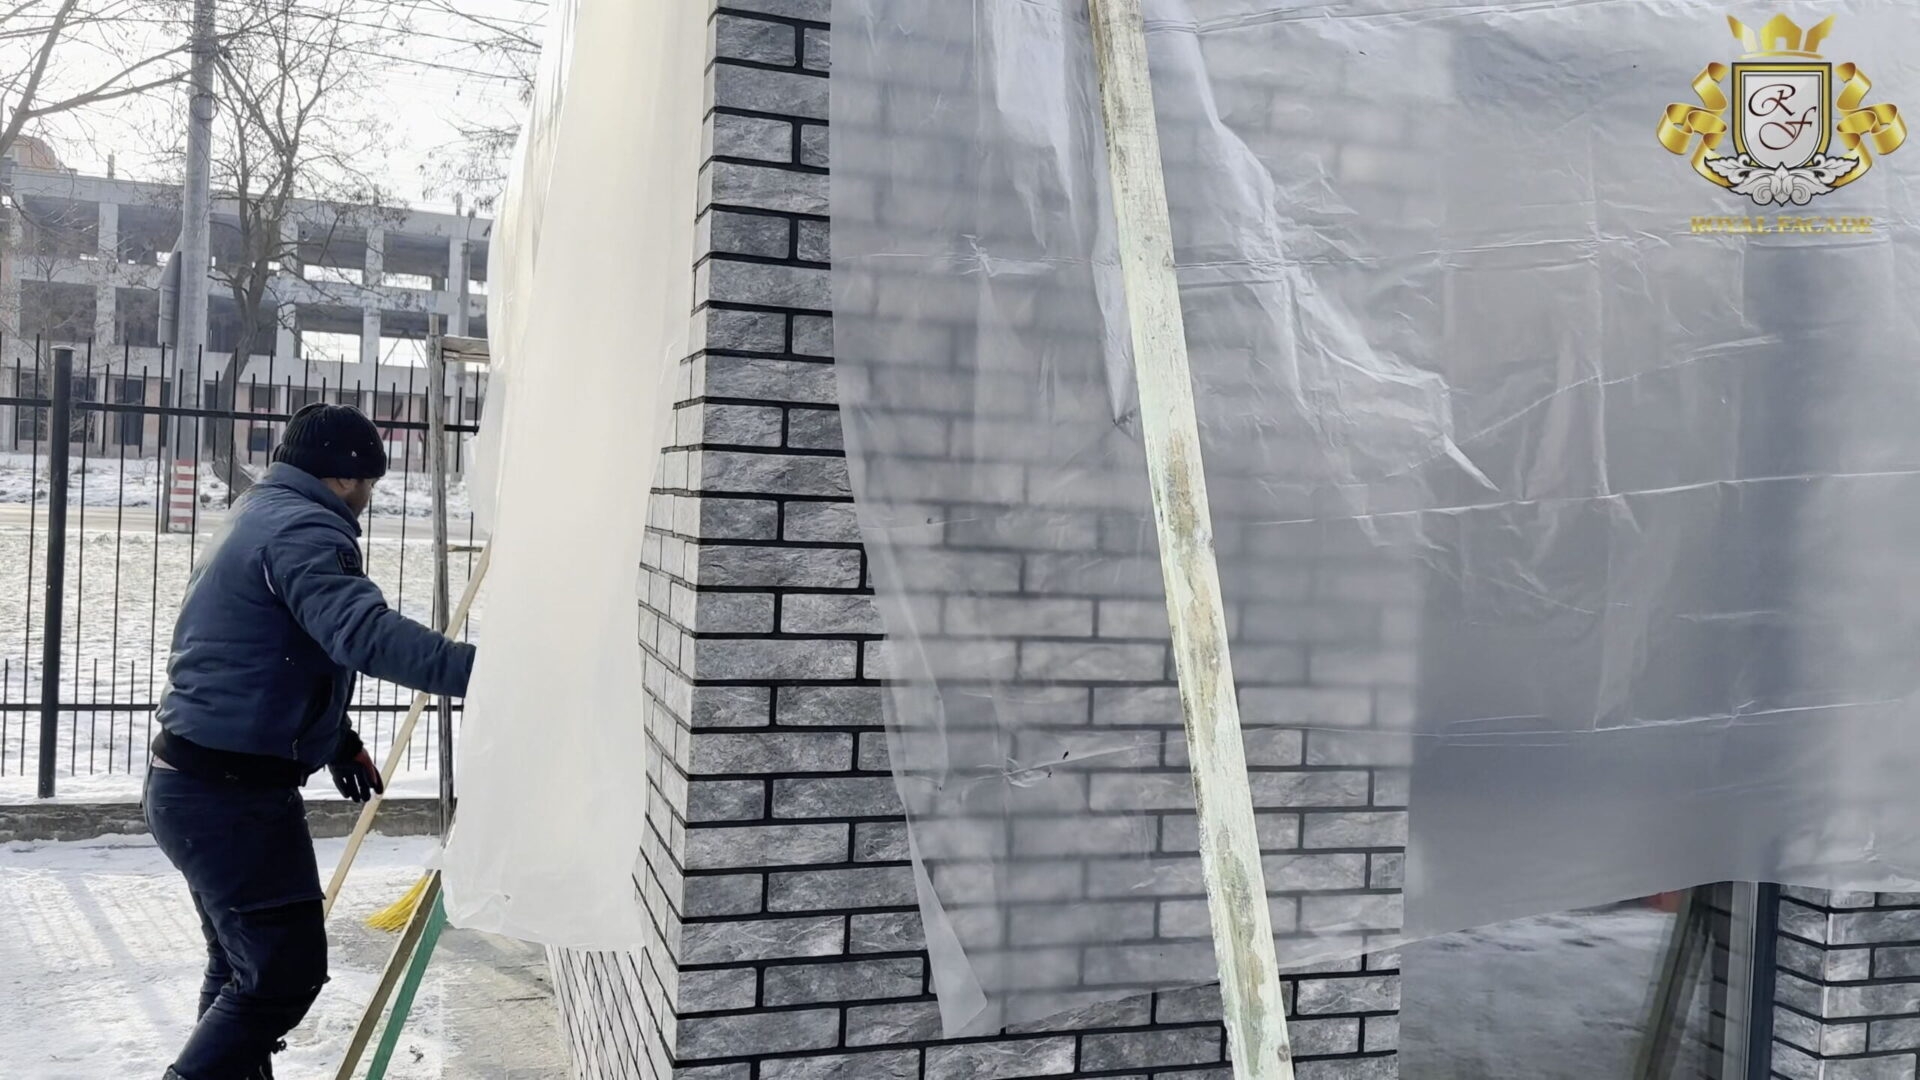
- Grouting with a semi-dry mix. If grouting occurs with interruptions, the masonry should be covered with polyethylene film, protecting it from UV rays and precipitation.
During the process of mixing and preparing the grouting mix, it’s recommended to strictly follow the proportions. Otherwise, different amounts of solution will result in different shades on the building facade.
Full hardening of the mixture occurs only after three weeks. Until then, you should not test the joints for strength.
Method 1. Grouting of Joints Using Semi-Dry Mixture
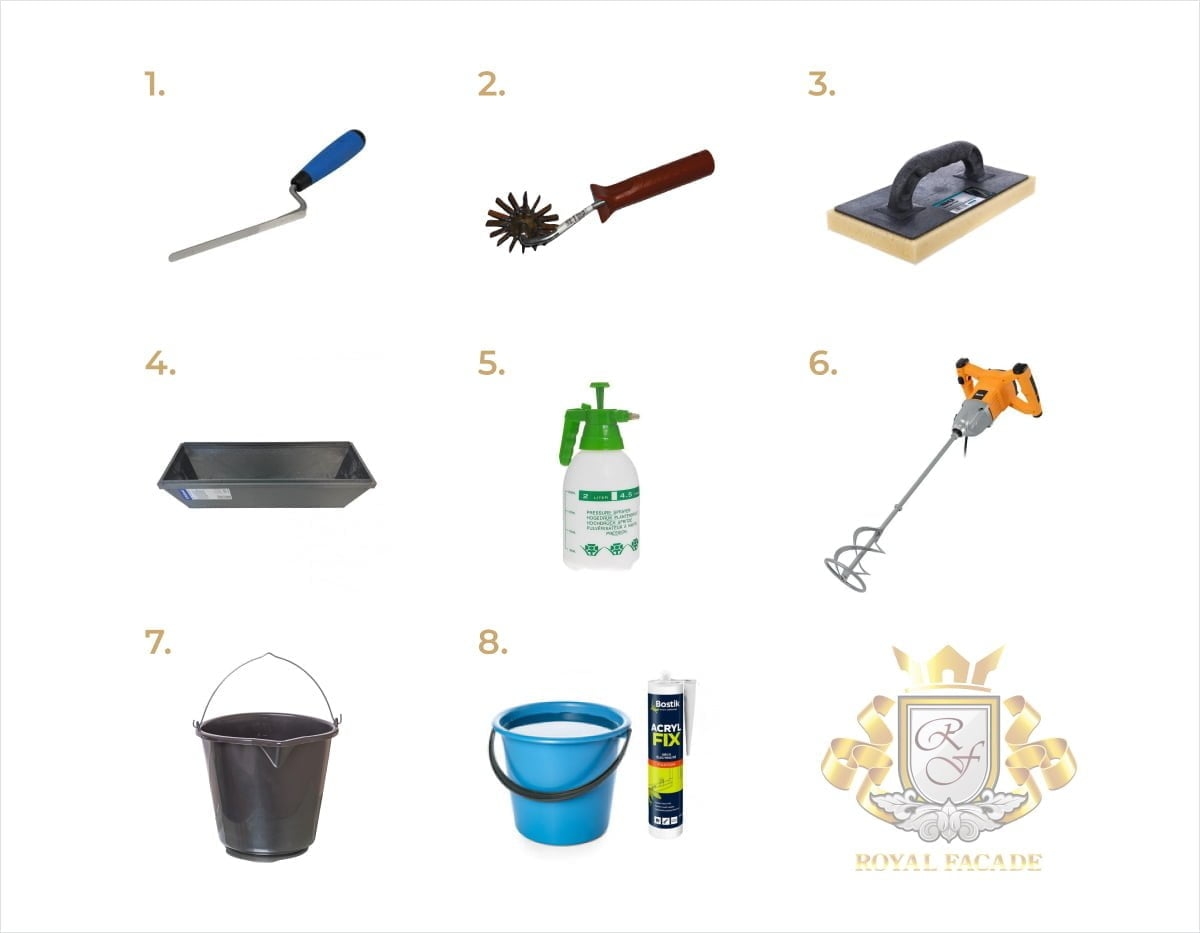
Tools needed for the planned work:
- Jointing tool
- Bucket
- Mixer with Concrete Mixing Head
- Water sprayer
- Work surface for mixing
- Brush for quick removal of excess mixture
- Metal roller (optional) for precise perforation of joints (insulation base)
- Water (or acrylic liquid – in this case, clarify all nuances of working with acrylic from the manufacturer)
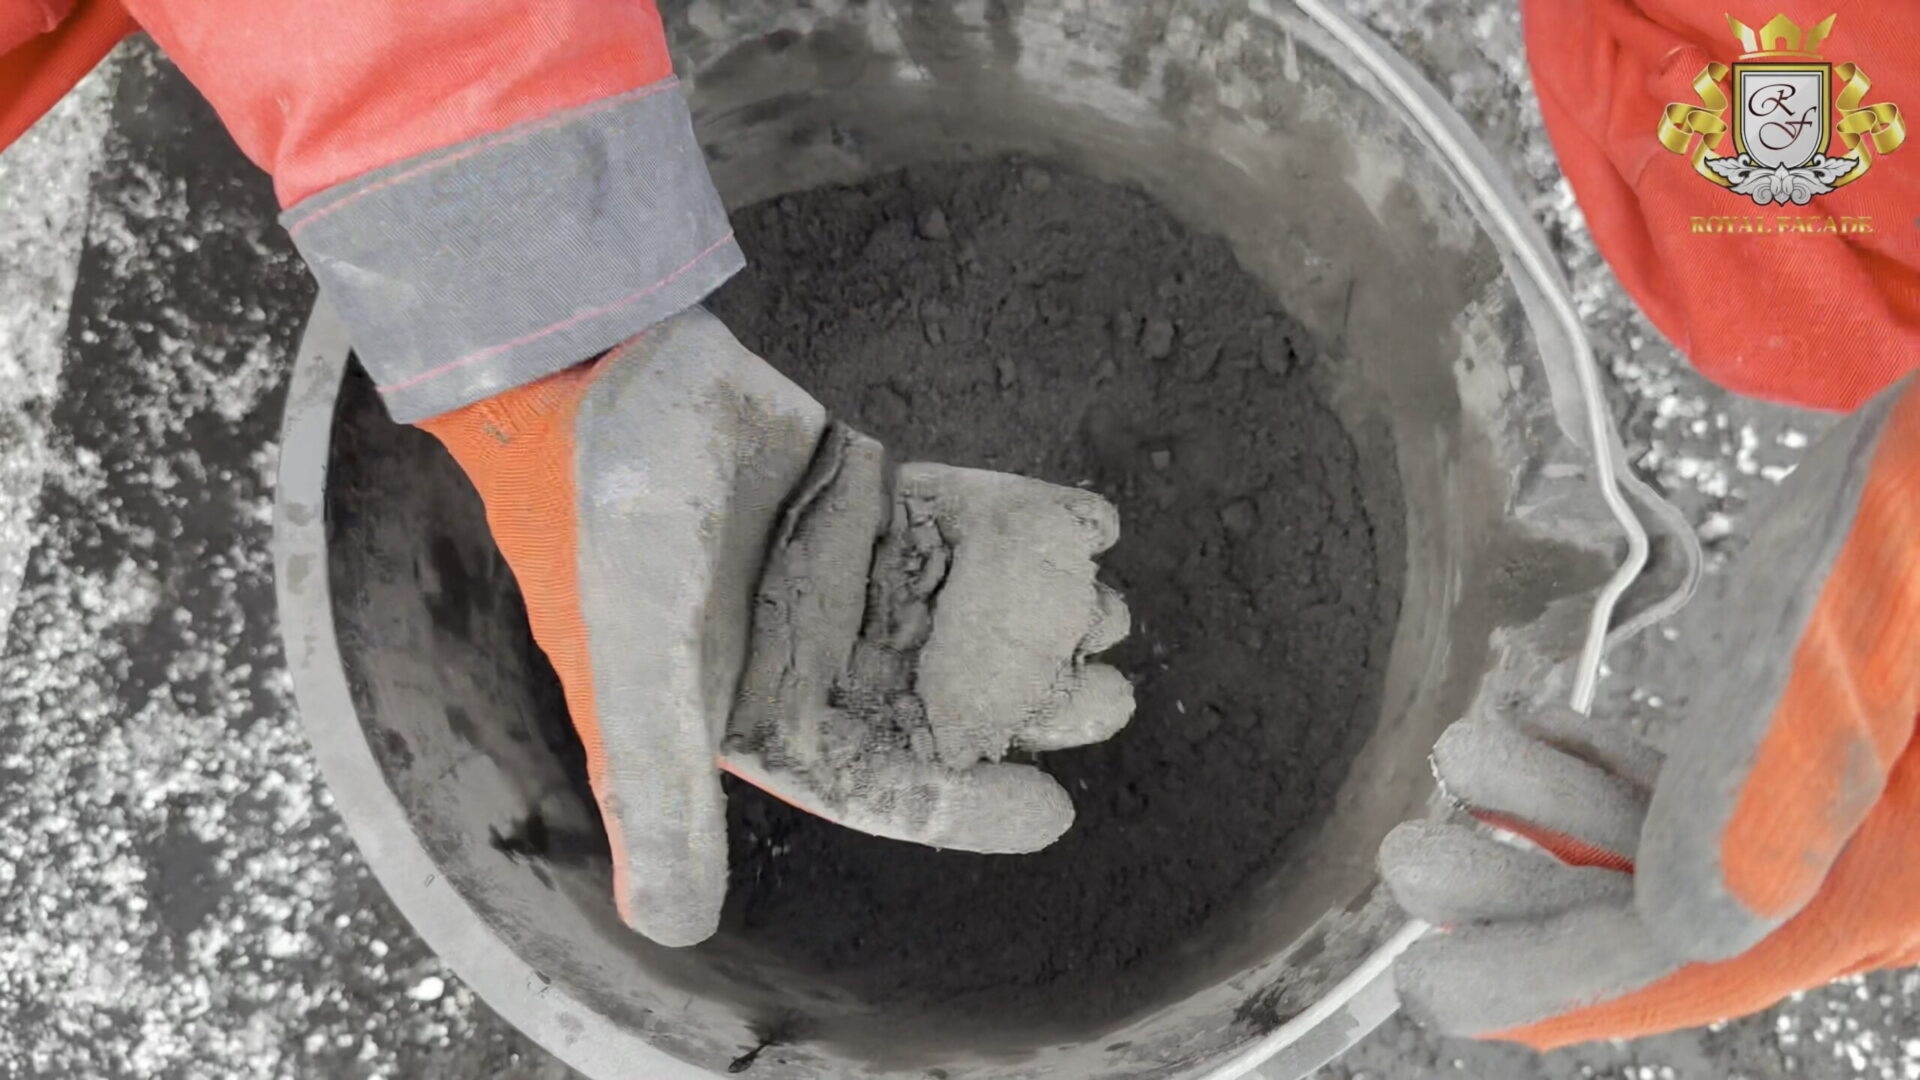
Mixture Preparation Process
The dry mixture should be combined with clean room temperature water (cooler rather than warmer). It’s important to follow all proportions specified in the technical specifications. During unstable temperature fluctuations (depending on the season when work will be performed), it’s recommended to use latex solution instead of water. This ensures that cement joint mixtures will achieve excellent adhesion, elasticity, strength properties, moisture resistance, and weather resistance. Additionally, latex solution has another important advantage – it reduces the likelihood of efflorescence, moss, and fungal growth. Following all rules will yield an ideal plastic mass with a consistency resembling damp soil. When preparing the mixture, add the dry mix in portions, and use a mixer/drill with an appropriate whisk for uniform mixing.
Remember that quality Thermal Panel Installation by yourself is entirely possible, but only if you follow all rules and technological specifications. One of the most common mistakes in mixture preparation is adding components “by eye.” This can result in negative consequences: joints on the facade appearing in different shades.
To prevent unwanted foam formation during mixing, take 5-minute technological pauses, after which you can repeat the mixing procedure just before beginning the planned work. The prepared mixture should be used within 1 hour after preparation. Mix all components in a convenient, clean, corrosion-resistant container. The trowel and all other tools should also be clean and made of corrosion-resistant materials.
Base Preparation
The base of the joint is polystyrene (expanded or extruded). It’s perforated using a special roller (optional). The minimum joint depth should be 0.4 inches or more. Otherwise, use a grout where acrylic solution is used instead of water. This gives the joint additional strength.
First, carefully clean the joint of debris, dust, dirt, and Expanded Polystyrene (EPS) residue. Moistening the masonry with water will be beneficial under the following conditions: extremely high outdoor temperature; strong wind or draft; clinker that strongly absorbs any liquid. But when moistening, be careful not to allow unwanted film formation on the clinker surface.
IMPORTANT! If proportions aren’t followed and different amounts of solution are added to the Grout, various shades will appear on the facade. Therefore, it’s recommended to use only identical proportions of acrylic/water in the mixture. Additionally, avoid preparing the mixture under variable weather conditions: for example, high humidity, bright sun, and heat. All these factors can negatively affect the future shade of the inter-tile joints. If the weather changes dramatically the day after joint treatment, cover the finished joints with polyethylene film until they are fully dry and hardened.
Furthermore, don’t add water/acrylic to previously prepared mixture that has already been used. This decision can also lead to shade changes in subsequent inter-tile joints. Remember that adding any foreign additives to the prepared mixture is prohibited!
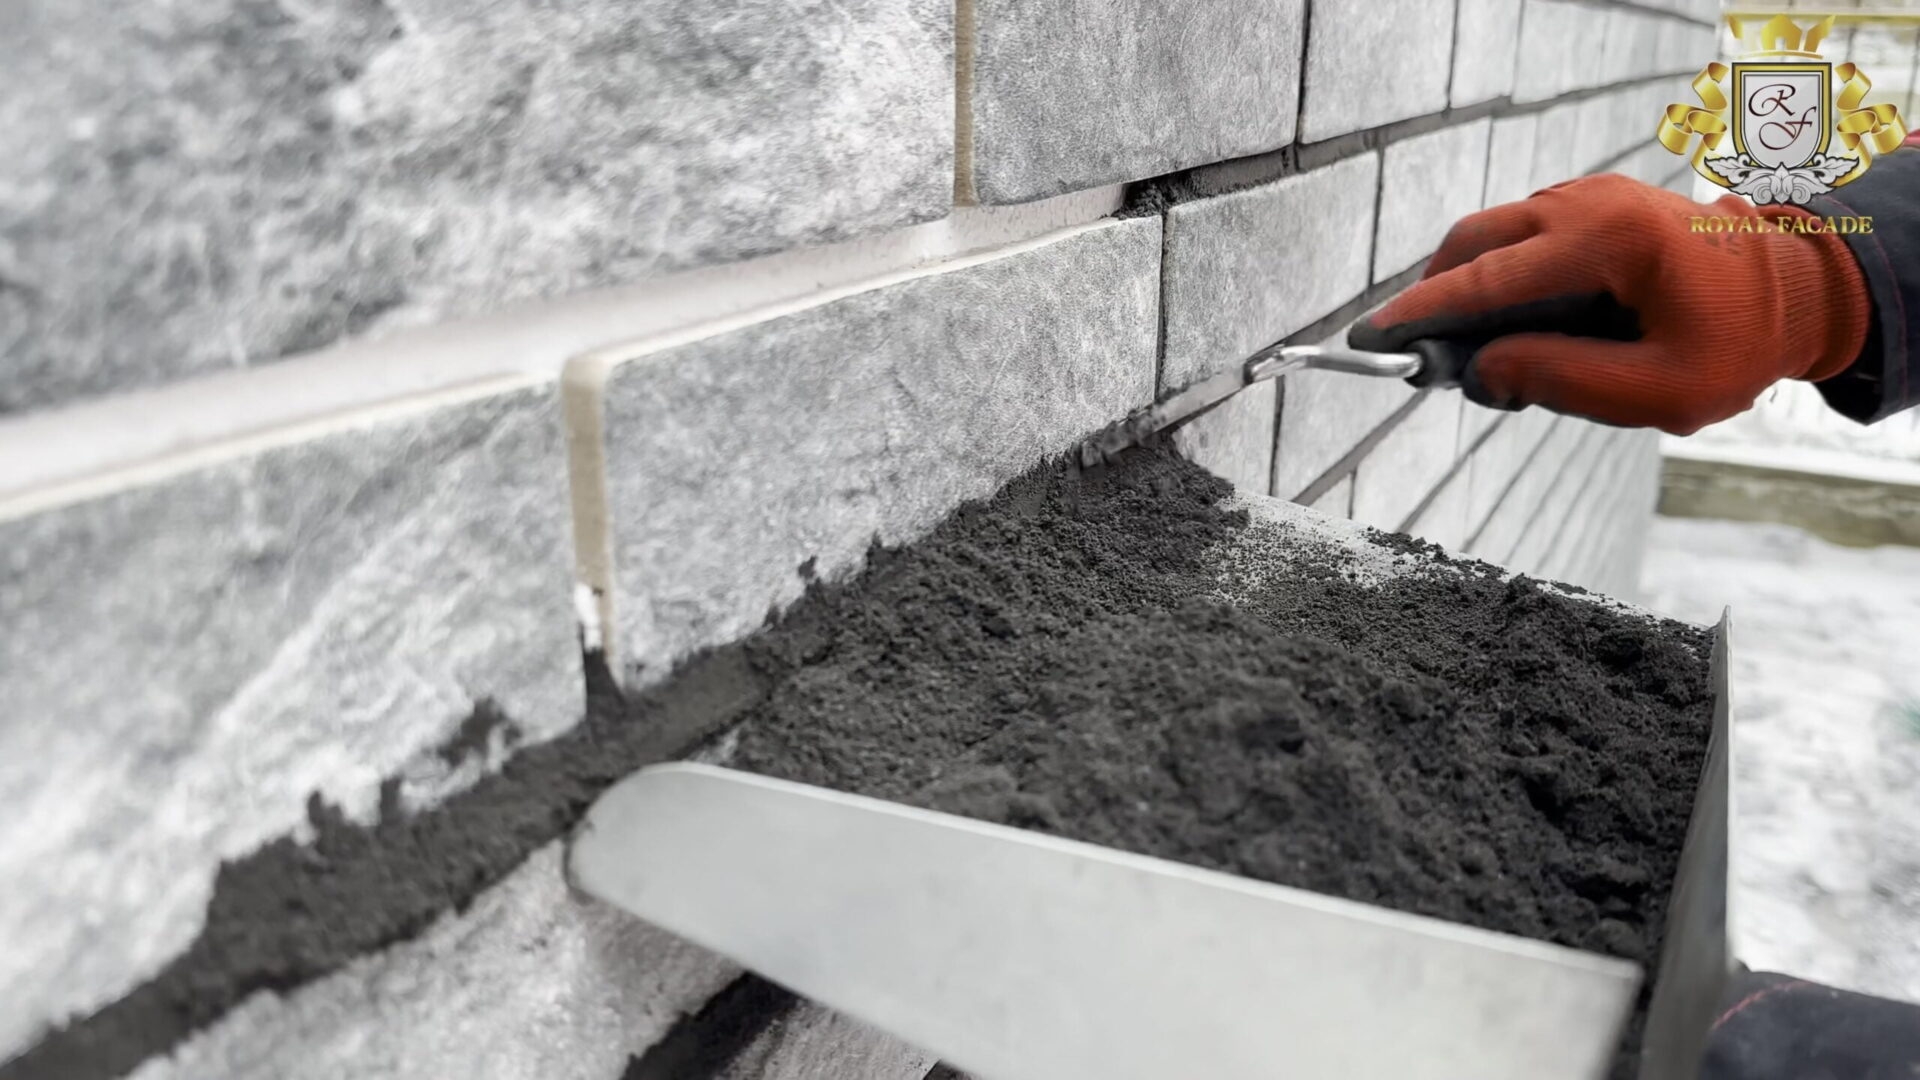
Application
If the joint depth is standard, apply the solution in two layers “wet on wet,” followed by pressing in.
Distribute the solution evenly in the joints, which guarantees uniformity of texture and color scheme after the drying and hardening process occurs.
If there are breaks in Joint Grouting, cover the masonry. It’s advisable to protect joints from drafts, ultraviolet radiation, and frost with polyethylene film, as mentioned above.
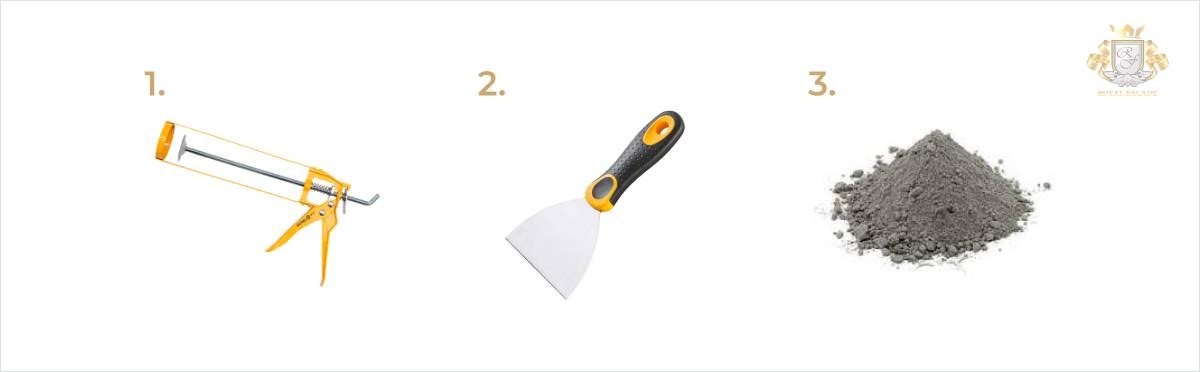
Method 2. Filling Joints Using a Hand Gun
TOOLS NEEDED:
- Gun for applying (extruding) the mixture
- Construction spatula
- Mixture for filling and Joint Pointing
Base preparation should be performed according to requirements of ASTM C926 and ASTM C1063 or applicable local building codes.
It’s necessary to thoroughly inspect the joints, cleaning them of adhesive residues and EPS Foam.
The joint also needs to be cleaned of dust, dirt, and possible debris. The masonry should be moistened with water if the work is being done in windy weather, at very high air temperatures, or when the clinker tends to strongly absorb liquid. However, when moistening, avoid forming a film on the clinker tile surface.
Be very careful not to have too much liquid in the prepared mixture. Otherwise, there’s a high probability of joint cracking and significant deterioration of the hydrophobic functions of the mix.
The mixture should be applied using a special hand gun. The mixture should slightly protrude from the joint. Creating a neat joint using a spatula can be done after a few hours. Ideal conditions for joint formation: the mixture consistency should resemble dry sand, and the surface should be completely dry.
For complete drying, approximately 3 hours may be needed (exact time depends on the tile base’s ability to absorb liquid, as well as air temperature). Excess mixture should only be removed after it has dried.
During the use of the mixture, adding water is prohibited, as this may significantly change the future shade.
If during work you notice the loss of the original consistency, it can be restored by re-mixing the mixture (without adding water).
If traces of grouting mixture are noticed on the tile surface, they can only be removed after complete drying: carefully lift the residue and wipe the surface with a dry cloth.
Upon completion of all planned work, and after complete drying and hardening of the mixture, the entire surface can be wiped with a damp cloth to remove possible contaminants.
IMPORTANT! If you experiment and add different amounts of solution to the trowel mix, you will get different shades on the facade surface. Only identical proportions of water/acrylic should be added to the mixture! Try to perform the mixing in similar weather conditions: for example, if today is sunny weather and tomorrow has increased humidity – such sharp changes negatively affect the future shade of the joint. If the joints have already been finished, but weather conditions changed the next day, then it’s necessary to protect the facade – cover it with polyethylene film. The joints under the film should be preserved until completely dry and hardened.
Additionally, resist the desire to add water/acrylic to a solution that was previously used for facade plates. Such a decision can also lead to different shades of inter-tile joints. Any additives or supplements should not be added to an already prepared solution!
Complete hardening of the mixture occurs within 3 weeks. Until this point, it is forbidden to independently test the strength of the mixture by any means. Otherwise, damage to the finished joints will occur!
How to Remove Salt in Joints?
If there is a violation of the Seaming technology, resulting in efflorescence, the following remedies should be used:
- Efflorescence cleaner SikaSikagard-S (instructions can be found on the packaging or via the link).
- After removing salts from the facade, the inter-tile joints can be treated with the hydrophobic agent SikaSikagard-71 W Pro.
Download Supplementary Materials
Technical solutions album for wall insulation panels with thin brick tiles ™ROYAL FACADE
Installation Instructions for insulated panels ™ROYAL FACADE
Need professional help?
ROYAL FACADE
Examples of finished projects
- ROYAL FACADE
FAQ
Our company operates throughout the United States. Delivery, installation and warranty are guaranteed.
The installation of facade panels based on polystyrene is carried out in several stages. The entire installation process can be conditionally divided into 4 main stages. The first stage involves preparatory work: the base must be clean, dry, and level. In the second stage, a starter profile is installed to prevent water accumulation (this element is also used to define the zero line). The third stage includes marking, drilling, and cleaning holes, followed by panel fixation. In the final stage, joints are grouted using grouting mixture.
The cost of Thermal Panel Facade Insulation is calculated individually for each client, taking into account certain features. The final price is formed considering the type and thickness of the insulation layer, the brand of clinker tile (decorative protective layer), and the specific quantity and size of fastening elements. When performing calculations, it’s necessary to consider the facade area of the specific house. Therefore, to clarify the cost of installation services, it’s recommended to contact ROYAL FACADE company managers for assistance.
A facade with clinker thermoplates is an excellent solution for reliably protecting any building from negative external factors. Additionally, these panels can give the building an aesthetically pleasing appearance. The facade is often called the “face of the house,” so it’s important to pay attention to the features of both its insulation and design. After completion of installation work, care for clinker panels is quite simple and straightforward: in case of dirt, the facade surface can be wiped with a damp or dry cloth.